 |
 |
|
|
|
|
|
| Chapter Index |
TITLEBLOCK STANDARDS |
First Chapter |
|
Most firms have a company titleblock which most probably originated as a manually or CADD-generated document. This same titleblock is probably the one that will be used in 90% of the work generated by that particular office. For the purpose of these company standards this titleblock will be referred to as Titleblock Master and reside within the Company Standards Directory.
Each project office will have a copy of this master titleblock within a Project-Specific Directory created according to the guidelines outlined below. This copy of the titleblock will then be customized for that specific project and x-referenced into each and every plot sheet of the project. Different titleblocks may be created for particular industry or government standards. The guidelines below apply to all titleblocks: |
|
W e b p a g e C h a p t e r s |
|
. . . . . . Company Standards Directory and Project Specific Directories . . . . . . |
|
. . . . . . Basic Areas for Standard Sizes and Typical Scale Titleblocks . . . . . . |
|
. . . . . . Titleblock Form and Project Specific Data In Separate Layers . . . . . . |
| . . . . . . Combining Client Logo Colors and Line Types On One Layer . . . . . . |
|
. . . . . . Project Specific Titleblocks Cross-Referenced in Paper Space . . . . . . |
|
. . . . . . Using Grid & Snap Commands to Establish Titleblock Margins . . . . . . |
|
|
| Back to Intro | Company Standards Directory and Project Specific Directories |
Next Chapter |
|
The main difference between 'Company Standard' and 'Project-Specific' directories is that titleblocks on company standard servers are templates that are write-protected - while titleblocks copied to project directories are meant to be edited by the Project Architect or by project managers in charge of each project. Here is an example of a typical commercial project titleblock with project data along the right: Residential project titleblocks may have a simpler project data strip along the bottom instead. This type of titleblock provides a wider 'active area' so that floor plans do not have to be divided with match-lines unless absolutely necessary. It is also the best format for smaller paper sizes. Unless noted otherwise, typical commercial projects will use Architectural 42" x 30" Titleblocks for construction documents. |
|
- * - |
|
Project directories are initiated by the CADD Director or the project manager for each individual project. The following "basics" are shown here for the benefit of new users who may not be acquainted with DOS or Windows procedures and terminology. (Only portions in italics are actually typed-in on the keyboard by the user.) Experienced users may wish to skip over the next two sections to the 'Guidelines for Creating a Project-Specific Directory' section below or jump to the next chapter. Creating a "Company Standards Directory" in DOS:
Creating a "Company Standards Directory" in Windows:
- * - Guidelines for Creating a "Project-Specific Directory" using a Pyramid Configuration A project-specific directory must be created for each new project. Following procedures similar to the ones outlined above, a Directory Pyramid can be created within a main Projects Directory, either on the company server or on a designated project workstation, as shown below. The following Six-Level Pyramid example is shown as a guideline to illustrate a typical Project Subdirectory Scheme: C:\ C:\Projects C:\Projects\UCLA-96 C:\Projects\UCLA-96\dd-dwgs C:\Projects\UCLA-96\dd-dwgs\arch-ph1 C:\Projects\UCLA-96\dd-dwgs\arch-ph1\*.dwg Typical level 5 subdirectories are: arch-ph1, elec-ph1, ints-ph1, lscp-ph1, mech-ph1, strc-ph1. Level 1 of the pyramid can be a local C: drive or a "mapped" network drive on a centralized server. A natural letter to map this drive to is "P:" for projects. For additional information on centralized server drive mapping, typical directory, subdirectory and file naming standards see the web page labeled 'Alphabetical Naming Conventions', by clicking on the link below: Level 2 of the pyramid is suggested to be P:\PROJECTS on central servers for several reasons. Not only is this an extremely convenient place to perform backups from, but it also makes it easier for an operator to find all of the current projects on-line in one place. It also makes it much easier to control and assign permissions for an entire directory on a project by project basis. (Using all capital letters for the central server and caps-and-lower-case on workstations will also help to avoid costly mistakes when synchronizing projects back to central while burning the midnight oil - as so many of us love to do from time to time.) Level 3 of the pyramid is a self-contained PROJECT DIRECTORY. This directory should contain "all" of the elements required for that particular project. A backup of this directory should not require drawings, documents or databases from any other directory in order to restore the project from an archive to it's original state. The number "96" in the sample above refers to the year. (Assuming that more projects will be performed for a particular client on a yearly basis or at some future date.) This directory could also be renamed as UCLA-96a to identify multiple buildings or multiple contracts within the same year if needed. Level 4 of the pyramid refers to the PROJECT DEVELOPMENT LEVEL. This includes sk-dwgs for Sketches and/or Schematic Design Drawings, dd-dwgs for Design Development Drawings and cd-dwgs for Construction Document Drawings. Other significant directories at this level may include ar-stds for Architectural Standards and id-stds for Interior Design Standards - as well as the tb-stds directory for the Project-Specific Titleblocks. Only organizational directories belong at Level 4. Under no circumstances should any drawings be placed here. Level 5 of the pyramid is the PROJECT PHASE AND PLOT SHEET DIRECTORY. Here is one of the most important control points in the backup and archive process of any given project. By simply adding the three (3) letters "ph1" to a standard four (4) letter plot sheet directory (i.e. ints-ph1), different phases or versions of a design can be properly documented, then backed-up and archived for future use. These titleblocks would then be X-referenced into each of the final assembled "Plot Sheets", with consistent text and logos clearly identifying the project phase. Only plot sheets belong at this level. This directory must be kept absolutely clean and reflect the actual drawing index. (If there are twelve final drawings on paper, then there should be twelve drawing files in this directory.) Level 6 is the final PROJECT BASE DRAWING AND DETAIL CELL SUB-DIRECTORY. This is where the actual base drawings used to assemble plot sheets in the directory above reside. All of these base drawings will eventually be X-referenced into one or more plot sheets. Even if at first glance it seems that six levels of sub-directories is excessive, it should be noted that once all of these directories and subdirectories are created, a simple point-and-click operating system is all that is needed to find and access any drawing necessary. The days of command line full-path typing are over and only the most die-hard DOS and Unix users still insist on short "cryptic and hard to interpret" file and directory names. Pyramid Configuration Summary Using any more than six levels of subdirectories should be avoided as much as possible. Consistency from one project to another is highly desirable and maintaining each of these levels as shown above is one of the most basic ways to achieve this. Firms that have to do without a dedicated CADD Director (i.e. A combination Project Architect and Cadd Manager.) often end up overloading Office Managers, Cadd Operators, or Secretaries with the responsibility of performing backups and archives. Without simple an logical safeguards in place, this is usually a formula for disaster. Using the pyramid system and naming conventions mentioned should provide these firms with food for thought and a place to start getting organized, at the very least. |
|
- * - |
|
|
| Chapter Index | Basic Areas for Standard Sizes and Typical Scale Titleblocks |
Next Chapter |
|
Although most offices regularly use letters to signify different paper sizes, most offices do not have adequate standards for organizing CADD titleblocks according to paper size. By incorporating this 'single letter' into their titleblock file names, a simple and elegant in-house standard can be developed. An intuitive standard that will require very little explanation. The following chart is provided as a quick-reference guide to selecting the appropriate size and titleblock name to match a specific X-axis by Y-axis building footprint. (Note: allow for margin space. Sizes shown are to actual edge of paper.) |
|
< File Name > |
< 1" = 1" > |
< 1/2" = 1'-0" > |
< 1/4" = 1'-0" > |
< 1/8" = 1'-0" > |
< 1/16" = 1'-0" > |
|
tba-mstr.dwg |
11" x 8.5" |
22' x 17' |
44' x 34' |
88' x 68' |
176' x 136' |
|
tbb-mstr.dwg |
17" x 11" |
34' x 22' |
68' x 44' |
136' x 88' |
272' x 176' |
|
tbc-mstr.dwg |
24" x 18" |
48' x 36' |
96' x 72' |
192' x 144' |
384' x 288' |
|
tbd-mstr.dwg |
36" x 24" |
72' x 48' |
144' x 96' |
288' x 192' |
576' x 384' |
|
tbe-mstr.dwg |
42" x 30" |
84' x 60' |
168' x 120' |
336' x 240' |
672' x 480' |
|
tbf-mstr.dwg |
48" x 36" |
96' x 72' |
192' x 144' |
384' x 288' |
768' x 576' |
|
< File Name > |
< 1" = 1" > |
< 1" = 20'-0" > |
< 1" = 30'-0" > |
< 1" = 40'-0" > |
< 1" = 50'-0" > |
|
tba-mstr.dwg |
11" x 8.5" |
220' x 170' |
330' x 255' |
440' x 340' |
550' x 425' |
|
tbb-mstr.dwg |
17" x 11" |
340' x 220' |
510' x 330' |
680' x 440' |
850' x 550' |
|
tbc-mstr.dwg |
24" x 18" |
480' x 360' |
720' x 540' |
960' x 720' |
1200' x 900' |
|
tbd-mstr.dwg |
36" x 24" |
720' x 480' |
1080' x 720' |
1440' x 960' |
1800' x 1200' |
|
tbe-mstr.dwg |
42" x 30" |
840' x 600' |
1260' x 900' |
1680' x 1200' |
2100' x 1500' |
|
tbf-mstr.dwg |
48" x 36" |
960' x 720' |
1440' x 1080' |
1920' x 1440' |
2400' x 1800' |
|
Although many of our projects are international in nature, no attempt has been made here to address metric paper sizes and standards. Most standards can be converted easily, without much modification. In reality, the metric paper sizes are more modular and scale between each other more gracefully. As with all things in life, there are pros and cons to using imperial vs. metric standards. Please contact us if you require additional information for either imperial or metric titleblock standards. |
|
- * - |
|
|
| Chapter Index | Titleblock Form and Project Specific Data in Separate Layers |
Next Chapter |
|
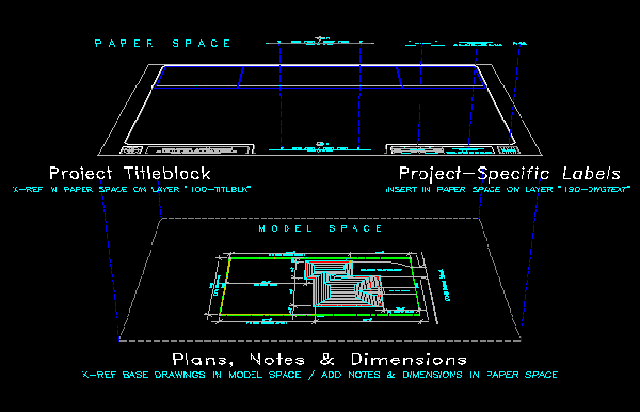
To make the titleblock absolutely simple, only two (2) layers are actually required. One using a thin line-weight color (light grey for instance) to signify the equivalent of a pre-printed 'blank titleblock'. The other using a medium-weight color (cyan for instance) to clearly identify the project-specific textual and client logo information (usually added by hand on pre-printed titleblocks). Note that any text labels normally found on a pre-printed titleblock should be placed within the "titleblock" layer and that both layers may contain more than one color. (see diagram below) |

|
The 'blank' project titleblock illustrated above is in one layer, project-specific labels are on another layer, with model space contents illustrated below. For additional information, see the web page linked below: |
|
- * - |
|
|
| Chapter Index | Combining Client Logo Colors and Line Types On One Layer |
Next Chapter |
|
Most new CADD programs currently available will allow you to use multiple colors within a single layer, and that feature may very well be desirable to create a multi-color logo for instance. There is no way that using ten different layers to create a single logo is justified given the added overhead and confusion that this creates. A logo should be created as a separate drawing and then inserted on the titleblock drawing as a 'block' on a single layer. Patterns and crosshatching used in a logo should be minimal and optimized for the final size to be used. If the need arises for a much larger sized logo, another version of the logo should be generated. A sample name for a basic company logo is SSA-logo.dwg, where the first three (3) letters are a standardized abbreviation for the company name. All logo blocks should be placed in the Titleblock Standards Subdirectory. Company logos on tilteblocks need to be consistent from project to project. Both the Client Logo and the Project Title Header are items that will appear on each and every titleblock of the project. As such, they should be created with great care and attention to detail. Logos all reside on a layer separate from the 'titleblock line-work layer'. (i.e. on layer 190-dwgtext not on layer 100-titlblk.) The logo may use multiple colors for visual or plotter line-weight effects. Fonts used for the Project Title Header should be standard system fonts in order to avoid conflicts when transferring files to Project Consultants. All text not related to the logo should use standard text sizes and colors. Only "logo-related text" is allowed to use odd sizes or to utilize multiple colors for accuracy. |
|
- * - |
|
|
| Chapter Index | Project-Specific Titleblocks Cross-Referenced in Paper Space |
Next Chapter |
|
Project-Specific Titleblocks are titleblocks customized for a specific client and a specific project. The use of X-ref titleblocks in paper space can make updating drawings an automatic and simple process.
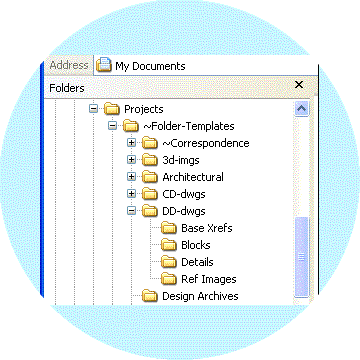
Having discussed Directory Structures at the macro level, from a bird's eye view if you will - we now move on to examine the very simple concept of the 'Four (4) Folder' directory sub-structure at the micro level: |
|
Projects In capitals and lower-case tell us this is a workstation and not a central server. ~Folder Templates A temporary 'place-holder' for a project folder name. ( example: ES-Singapore-07 ) ~Correspondence The plus (+) signs along the left signify that there are subdirectories present. 3d-images Primary 3D model drawings folder with an easy access '_Current Images' subdirectory. |
 |
Architectural The folder where drawings initially reside until moved to working-phase folders. DD-dwgs Folder to become CD-dwgs and remain as an archive. - Base Xrefs Titleblocks + base plans. - Blocks CADD symbols and blocks. - Details Project-specific details. - Ref Images Client logos, renderings, vicinity maps, etc. |
|
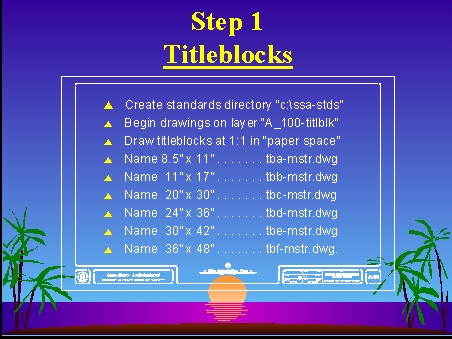
Guidelines for Creating "Project-Specific Titleblocks" using Paper Space After creating a company standards folder (i.e. C:\SSA-stds), a set of Company Master Titleblocks can be created in accordance with the 'Sunn-Starr Interactive CADD Standard Guidelines' shown in this sample document: Download document in Adobe pdf format to view or print Titleblock Procedure Images courtesy of: F + A Architects - Glendale, California |
|
|
| Chapter Index | Using Grid & Snap Commands to Establish Titleblock Margins |
Back to Intro |
|
Due to nature of assembling detail sheets from 'detail cells' located within a detail-cell-grid in the active area of a tilteblock, it is absolutely necessary to establish titleblock margins to line up the selected detail cell grid by using the Grid and Snap commands in AutoCad. Although most of the time titleblocks will be placed in paper space at 1:1 (or actual size), it may become necessary at times to use titleblocks created in model space at a specific scale. The following chart illustrates the various settings used for Grid and Snap (and corresponding text sizes required) for titleblocks drawn at the scales specified below: |
|
< Scale > |
< Grid > |
< Snap > |
< Text 1 > |
< Text 2 > |
< Text 3 > |
|
1" = 1" |
.2 |
.1 |
3/32" |
1/8" |
3/16" |
|
6" = 1'-0" |
.4 |
.2 |
3/16" |
1/4" |
3/8" |
|
3" = 1'-0" |
.8 |
.4 |
3/8" |
1/2" |
3/4" |
|
1 1/2" = 1'-0" |
1.6 |
.8 |
3/4" |
1" |
1 1/2" |
|
1" = 1'-0" |
2.4 |
1.2 |
1 1/8" |
1 1/2" |
2 1/4" |
|
3/4" = 1'-0" |
3.2 |
1.6 |
1 1/2" |
2" |
3" |
|
< Scale > |
< Grid > |
< Snap > |
< Text 1 > |
< Text 2 > |
< Text 3 > |
|
1/2" = 1'-0" |
4.8 |
2.4 |
2 1/4" |
3" |
4 1/2" |
|
3/8" = 1'-0" |
6.4 |
3.2 |
3" |
4" |
6" |
|
1/4" = 1'-0" |
9.6 |
4.8 |
4 1/2" |
6" |
9" |
|
3/16" = 1'-0" |
12.8 |
6.4 |
6" |
8" |
1'-0" |
|
1/8" = 1'-0" |
19.2 |
9.6 |
9" |
1'-0" |
1'-6" |
|
1/16" = 1'-0" |
38.4 |
19.2 |
1'-6" |
2'-0" |
3'-0" |
|
Remember that drawings will require different Grid and Snap settings to be coordinated with each other in both paper and model space. Consistent text label sizes, line spacing, and notation alignments can be easily accomplished once these simple settings are mastered and put to good use. For additional information regarding detail cell conventions, see the web page labeled: |

For internal service requests please forward your e-mail to cadd director at the link below :
Copyright © Sunn-Starr Architectural, Inc. Lookinglass Systems Division ® 1984